
Politics got you down? Classes not exactly fulfilling your creative side? What better way to cheer yourself up than to do a little dorm DIY.
We can’t always control what happens in the world, or our lives, but we can control our environment and make it a comfortable safe haven to escape the day-to-day perils. I have tried and tested some bangin’ DIY tutorials. I know as students we not only have a tight budget on dough, but a tight budget on time, too. That’s why I timed my endeavours, told you exactly where I bought my items, and exactly how much everything cost.
Here, I will show you how to make your very own terrarium, pin board, and decorated mirror! I got most of the items for the projects at the dollar store located at Harbour Centre, or Dressew a couple of blocks away on Hastings Street.
Terrarium
I remember my parents having a very large terrarium that sat in our living room when I was a child. Apparently, they were all the rage in the eighties. I remember being so amazed that the plant life could nearly water itself and thrive when there appeared to be no opening to the outside world!
The modern take on terrariums do typically have openings, but you are free to choose any type of container you want. In fact, picking one can be the best part.
| What you will need | Where to get it | Cost |
| Glass container | Dollar store, or recycling | $0.00 – $4.00 |
| Potting soil | Dollar store | $0.63 |
| Activated carbon/charcoal | Mr. Pets (any pet/fish store) | $4.99 |
| Gravel | Mr. Pets (any pet/fish store) | $0.00 – $3.50 |
| Plants | Wonderbucks or Burnaby campus AQ | $2.00- $10 |
| Moss | Outside | $0.00 |
| Total: | $25.50ish |
Assembling this project only took me 13 minutes, making it the most cost-effective for your time budget. Again, I cannot stress enough: be creative with your items. You would be surprised at what could work as a container for this project! I was able to find moss outside, not too far from my home. Gravel can also be found in your neighbourhood parks or beaches. Even your tiny toy Yoda will look bad-ass surrounded by his own tiny environment, too!
To make it cheaper, some tutorials say that activated charcoal is not required, however, it does work to purify and keep your plants healthy.
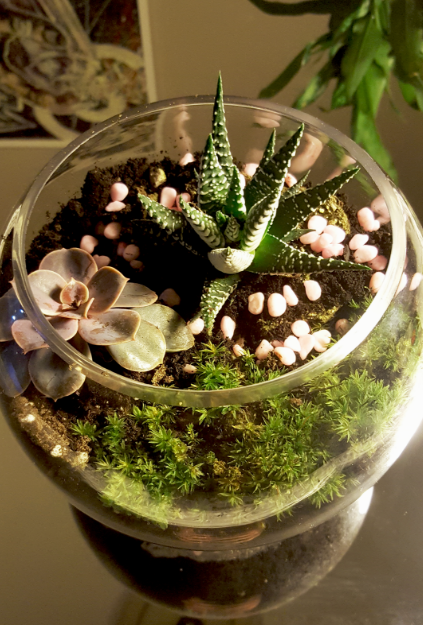 Step one: Lay a foundation of gravel.
Step two: Add a level of charcoal.
Step three: Add potting soil.
Step four: Add plants and whatever else you want!
Pin Board
This pin board is great for hanging to-do notes, jewelry, inspirational quotes to get you through that essay, or maybe even your voodoo doll— if you’re into that kind of thing. I recommend that before making this project, try to find as many items for free as possible. I was able to find good quality cardboard for free outside my apartment. I was also able to borrow a pair of box cutters. Someone you know is bound to have some supplies worth borrowing, so ask around!
The first step is to measure your board and cut it to a shape you desire. I’m all about making life easier, not harder, so I chose to make mine square. I’ll admit, cutting out the outline for the pin board was a graceless task. I measured the cardboard and used box cutters. However, due to reckless speed, perfect symmetry was not accomplished. So if you’re a perfectionist, take your time with this step.
Step two is to cut your fabric to an appropriate size and lay the cardboard on top of it. (As an aside, I bought 0.7 meters of fabric and had leftovers, to give you something to reference.) Glue gun the fabric to the back of the cardboard so that the front will be smooth.
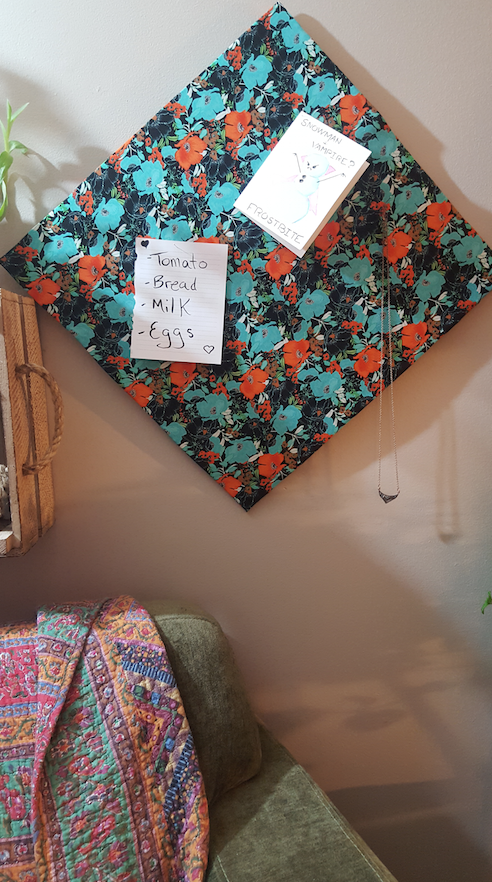 Lastly, add the string to the back with some more glue and you’re ready to hang this up for all to see! Just add pins and it’s ready to go. It took me only 30 minutes to complete this project.
| What you will need | Where to get it | Cost |
| Cardboard or cork board | Recycling or dollar store | $0.00 – $2.00 |
| Box Cutters | Borrow or dollar store | $0.00 – $2.00 |
| Fabric | Dressew | $6.99 or less |
| Glue gun + glue | Dollar store | $3.50 + $1.25 |
| Pins | Dressew | $0.49 |
| String | Dollar store or Dressew | $0.00 – $2.00 |
| Total: | $12.24 |
Decorated Mirror
This one was the simplest project.
| What you will need | Where to get it | Cost |
| Mirror | Walmart | $0.00 – $20.00 |
| Flowers | Dollar store | $1.25 – $3.00 a bundle |
| Glue gun and glue | Dollar store | $3.50 + $1.25 |
| Total: | $4.25 – $29 |
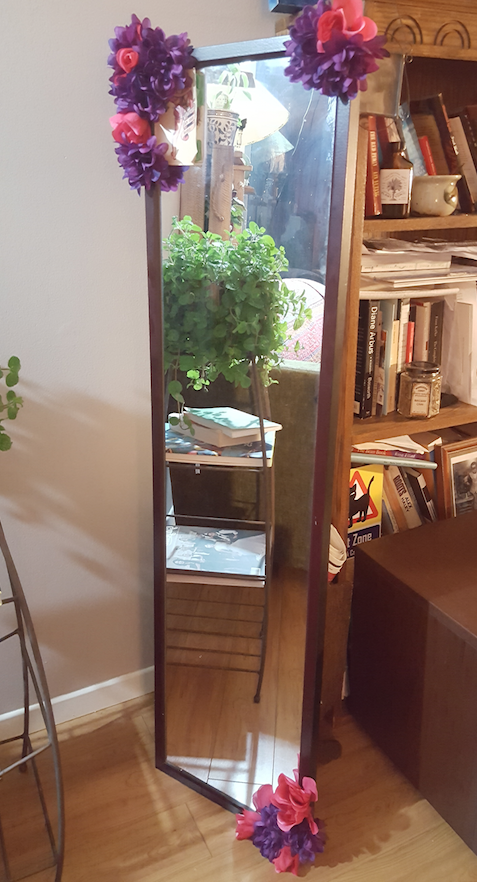 I already had the mirror, but it was a cheap one from Walmart ($20) and the glue gun from the previous project.
I feel this DIY is a bit obvious, so I’ll spare you the step by step process and leave you with some tips instead. This project looks best if you buy flowers in an assortment of colours. I chose only two, purple and pink, and if I could do it all again, I’d try to throw some more mixture into it!
Pulling the actual blossom from the plastic stem was a bit messy, so make sure you do this in a spot you don’t mind cleaning up later. Other than that, glue and stick — you got this!
I hope this helps you find the items you need to make your room unique and more homey without wasting precious time or money! Happy crafting!
